Native American Medicine Bags and Power Stones
Teacher: Joy Danila
Grade Level: 2nd- 4th grades
Time Needed: Aprx 5, 40 min classes
NCAS Standards:
Anchor Standard: Perceive and analyze artistic work
Performance Indicators: Determine messages communicated by an image.
Anchor Standard: Synthesize and relate knowledge and personal experiences to make art.
Performance Indicators: Create works of art that reflect community cultural traditions.
Anchor Standard: Organize and develop artistic ideas and work.
Performance Indicators: Create personally satisfying artwork using a variety of artistic processes and materials.
Project Summary and Rationale:
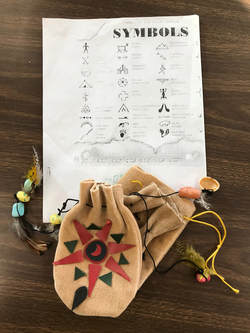
Students design and make a traditional medicine bag, demonstrating previous and integrated knowledge from their core subject areas in Native American Studies. Symbolism, patterns, history, and cultural beliefs are explored.
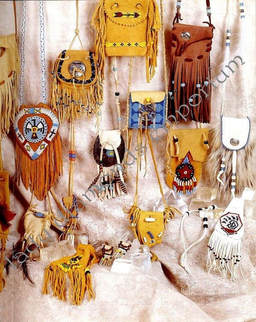
Students investigate Native American medicine bags, the medicine of power stones and symbolism in various cultural and geographic Native Communities.
Students design their medicine bag on paper with pencil, then replicate their design to build an individually meaningful medicine pouch. The designs are drawn from the paper sketch onto fabric, which is then cut out and glued onto the front and back of the medicine bags. Students use fabric, felt, tacky glue and scissors to create their bags, paint beads and stones, weave a cord through the top of the bag, and attach feathers and beads to the drawstring of their pouches. Students place their handmade power stone inside the bag, along with any other small and meaningful items they feel represent or protect themselves.
Enduring Understandings
Knowledge Objectives/Learning Targets-
Students will know:
Skills Objectives/Learning Targets
Students will be able to:
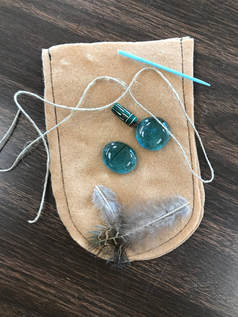
Materials: Paper, pencil, tacky glue, felt and fabric in natural tones, fabric scissors, toothpicks, glass stones, ceramic and wooden beads, sharpies, paint, brushes, hem cord, large plastic needles, pre-sewn pouches (sewn at the bottom and up the sides) aprx. 4” x 3” made from tan fleece or synthetic leather fabric.
Resources:
https://youtu.be/sB4SaRzGLVg
https://www.pinterest.com/windsong/abenaki-blackfoot/
https://www.pinterest.com/windsong/art-lessons-for-kids/
Vocabulary: Medicine Bag, Medicine Pouch, Drawstring, Power Stone,
Motivation:
Lesson Sequence:
Introduction of the lesson: Introduce the lesson through Youtube video, visual techniques, and showing a slideshow of images from Pinterest - including modern and traditional medicine bags. Remind students to write names on the back of their sketches and to place sketch inside of pouch (as we will not be writing our names on outside of the fabric).
Implementation of the lesson: Ask motivational questions and use Visual Thinking Strategies to engage students with Native symbolism and meaning. Walk around classroom to facilitate lesson and engage with students as assistance is needed. Support the students with questions and anyone who might be struggling. Double check students are moving forward according to lessons and reteach to guide students who missed bits of the information.
Closure of the Lesson: Grade medicine bags, and give back to students to take home.
Differentiated Strategies:
Assessment:
Formative: Use direct observation and questioning (What steps should I do first? Which tools will I need to get from the supply table?); utilize classroom discussion with Visual Thinking Strategies; one to one check-ins with student and teacher; peer to peer assistance. Teacher will approve each stage before students progress to next phase (i.e., design thumbnail sketches, drawing and cutting designs from fabric and gluing them onto bag, weaving the cord through the pouch, painting or drawing with sharpies onto beads, then attaching them to the drawstring cord ends, attaching the feather, painting or using sharpies on a glass stone to make a “power stone”); observe class participation and engagement; show student progress - share each bag with the class at the beginning of each block as the projects are passed out.
Summative: Students will be graded based on rubric that covers each part of the assignment, and on participation and effort as well as safe use of supplies and tools.
Post implementation: Most students needed help attaching their beads to the drawstring cord. Most struggled with getting them in the correct order, even after three lessons including verbal, visual and tactile (touch and do while listening). They were attempting to string three beads in total, in this order: both strings go through the first bead so it can slide back and forth to open and close the bag, then each remaining bead goes at each end of a string, by itself. Many kids felt “bothered” that the sliding bead wouldn’t synch the bag closed securely. I assured them that gravity helps keep the bead down, as the bag is worn on your belt loop or around a necklace, and the bead which slides open and closed will stay down and keep the bag closed while it was being worn. The bead is meant to move easily to open back up so they could access their items inside. I might skip the beads next time, and NOT use fleece (too bulky to synch closed very well), in order to allow the drawstring to close more tightly (as it does when leather is used). I will price out synthetic-leather fabric.
Overall the lesson was so much fun and so successful that they wanted to take them home as soon as possible. I allowed them to do so, as display would be a challenge to showcase the bags.
Teacher: Joy Danila
Grade Level: 2nd- 4th grades
Time Needed: Aprx 5, 40 min classes
NCAS Standards:
- VA:Re.7.2.3a
Anchor Standard: Perceive and analyze artistic work
Performance Indicators: Determine messages communicated by an image.
- VA:Cn10.1.4a
Anchor Standard: Synthesize and relate knowledge and personal experiences to make art.
Performance Indicators: Create works of art that reflect community cultural traditions.
- VA:Cr2.1.3a
Anchor Standard: Organize and develop artistic ideas and work.
Performance Indicators: Create personally satisfying artwork using a variety of artistic processes and materials.
Project Summary and Rationale:
Students design and make a traditional medicine bag, demonstrating previous and integrated knowledge from their core subject areas in Native American Studies. Symbolism, patterns, history, and cultural beliefs are explored.
Students investigate Native American medicine bags, the medicine of power stones and symbolism in various cultural and geographic Native Communities.
Students design their medicine bag on paper with pencil, then replicate their design to build an individually meaningful medicine pouch. The designs are drawn from the paper sketch onto fabric, which is then cut out and glued onto the front and back of the medicine bags. Students use fabric, felt, tacky glue and scissors to create their bags, paint beads and stones, weave a cord through the top of the bag, and attach feathers and beads to the drawstring of their pouches. Students place their handmade power stone inside the bag, along with any other small and meaningful items they feel represent or protect themselves.
Enduring Understandings
- Through art-making, we can investigate other cultures’ perception, knowledge, and beliefs.
- Fabric and fiber arts can be used as an artistic medium
- How does traditional symbolism vary within Native culture depending on tribe and location?
- How does making art enable the artist to represent themselves to others?
- How do other cultures consider healing, spirituality, and the world around them?
- Why is it important to study art and creative practices from other cultures?
Knowledge Objectives/Learning Targets-
Students will know:
- Native symbolism and meanings from some native tribes
- What is a power stone
- What is a medicine bag
Skills Objectives/Learning Targets
Students will be able to:
- Construct and decorate a medicine bag
- Weave a drawstring cord through the top of their pouch
- Attach beads and feathers to the cord of the drawstring
- Decorate a stone to represent something important to them
Materials: Paper, pencil, tacky glue, felt and fabric in natural tones, fabric scissors, toothpicks, glass stones, ceramic and wooden beads, sharpies, paint, brushes, hem cord, large plastic needles, pre-sewn pouches (sewn at the bottom and up the sides) aprx. 4” x 3” made from tan fleece or synthetic leather fabric.
Resources:
https://youtu.be/sB4SaRzGLVg
https://www.pinterest.com/windsong/abenaki-blackfoot/
https://www.pinterest.com/windsong/art-lessons-for-kids/
Vocabulary: Medicine Bag, Medicine Pouch, Drawstring, Power Stone,
Motivation:
- Introduction: A brief introduction of lesson explaining the criteria of lesson.
- Visual Examples: Samples of work at various stage of completion are shown. Youtube video shows a brief introduction. Cultural examples on slideshow demonstrate traditional and modern weaving methods and uses.
- Inquiry Based Questions: What do we see in the symbols, and what do we think these symbols mean? What do we think a medicine bag is used for? What do we consider “medicine” and what do Native People consider “medicine”?
- Demonstration: A demonstration how to design, make and build our medicine pouch, how to string the cords, tie the beads and feathers, and how to decorate a power stone.
Lesson Sequence:
Introduction of the lesson: Introduce the lesson through Youtube video, visual techniques, and showing a slideshow of images from Pinterest - including modern and traditional medicine bags. Remind students to write names on the back of their sketches and to place sketch inside of pouch (as we will not be writing our names on outside of the fabric).
Implementation of the lesson: Ask motivational questions and use Visual Thinking Strategies to engage students with Native symbolism and meaning. Walk around classroom to facilitate lesson and engage with students as assistance is needed. Support the students with questions and anyone who might be struggling. Double check students are moving forward according to lessons and reteach to guide students who missed bits of the information.
Closure of the Lesson: Grade medicine bags, and give back to students to take home.
Differentiated Strategies:
- Present instruction/resources verbally and visually.
- Modify tools and materials for use by students with injuries or disabilities.
- Student A was unable to weave drawstring cord through the bag, so I punched holes around the top edge of the bag, and helped him as he wove the cord in and out of holes by hand, without a needle.
- Student B was unable to cut fabric, and together we decided that she might draw her design onto her bag with colored sharpies, rather than cutting fabric shapes and gluing them onto the bag.
- Some students used Elemer’s Glue, which did not stick, rather than the tacky glue, which will be reinforced more strongly in the next instruction.
- Adjust timelines to provide additional time for students with disabilities to complete work.
- Provide various means through which students with disabilities can communicate their ideas or questions.
- Encourage students with high ability to modify or interpret outcomes to capture greater levels of complexity or sophistication in interpretations of ideas or topics.
- Provide varying means through which students can express what they have learned.
- Encourage students to explore various subtopics of a larger topic or issue.
- Identify student readiness and learning differences and modify instruction to meet varying needs of students.
- Have student work in group with defined jobs, allowing for writing and verbal abilities to share thoughts/opinions.
Assessment:
Formative: Use direct observation and questioning (What steps should I do first? Which tools will I need to get from the supply table?); utilize classroom discussion with Visual Thinking Strategies; one to one check-ins with student and teacher; peer to peer assistance. Teacher will approve each stage before students progress to next phase (i.e., design thumbnail sketches, drawing and cutting designs from fabric and gluing them onto bag, weaving the cord through the pouch, painting or drawing with sharpies onto beads, then attaching them to the drawstring cord ends, attaching the feather, painting or using sharpies on a glass stone to make a “power stone”); observe class participation and engagement; show student progress - share each bag with the class at the beginning of each block as the projects are passed out.
Summative: Students will be graded based on rubric that covers each part of the assignment, and on participation and effort as well as safe use of supplies and tools.
Post implementation: Most students needed help attaching their beads to the drawstring cord. Most struggled with getting them in the correct order, even after three lessons including verbal, visual and tactile (touch and do while listening). They were attempting to string three beads in total, in this order: both strings go through the first bead so it can slide back and forth to open and close the bag, then each remaining bead goes at each end of a string, by itself. Many kids felt “bothered” that the sliding bead wouldn’t synch the bag closed securely. I assured them that gravity helps keep the bead down, as the bag is worn on your belt loop or around a necklace, and the bead which slides open and closed will stay down and keep the bag closed while it was being worn. The bead is meant to move easily to open back up so they could access their items inside. I might skip the beads next time, and NOT use fleece (too bulky to synch closed very well), in order to allow the drawstring to close more tightly (as it does when leather is used). I will price out synthetic-leather fabric.
Overall the lesson was so much fun and so successful that they wanted to take them home as soon as possible. I allowed them to do so, as display would be a challenge to showcase the bags.


